If you’ve ever struggled to find the perfect fit or fabric in stores, learning how to sew pajama pants is the ultimate DIY solution. This project is widely considered the “gold standard” for beginner sewists because it involves simple, straight seams and forgiving silhouettes. Whether you are looking to save money, create personalized gifts, or simply enjoy a relaxing weekend craft, this guide will walk you through every stitch. Ready to transform a few yards of fabric into your new favorite loungewear? Follow our step-by-step instructions below to master the basics.
What you need to sew pj pants
To ensure a smooth sewing process, gather these essential supplies before you begin:
- Fabric: Typically, you’ll need to know how many yards of fabric for pajama pants based on your size. Usually 2–2.5 yards of breathable material like cotton flannel, quilting cotton, or jersey knit.
- Elastic: 1-inch wide elastic, measured to fit your waist comfortably.
- Thread: All-purpose polyester thread that matches your fabric color.
- Tools: Sewing machine, fabric shears, straight pins, a safety pin (for threading elastic), and a fabric marker or chalk.
Preparing your pattern: Two easy methods
Before cutting your fabric, you need a blueprint. Choose the method that best fits your comfort level.
Using a professional pattern
Follow the size chart on the back of the pattern envelope rather than your standard store-bought clothing size. Professional patterns include “ease,” which is the extra room allowed for movement. Pin the paper pieces to your folded fabric, ensuring the “grainline” arrows run parallel to the fabric’s finished edge (the selvage).
The “No-Pattern” method (DIY template)
Use a pair of loose-fitting pants you already own as a template. Fold your existing pants in half lengthwise (pulling the crotch seam out so it’s flat) and lay them on your fabric. Trace around them, adding a 2-inch margin at the top for the waistband, a 1-inch margin at the bottom for the hem, and 5/8-inch along the sides for seam allowance.

Make pajamas with a sewing pattern
Step-by-step: How to stitch pajama pants
Once your pieces are cut, it’s time to head to the sewing machine.
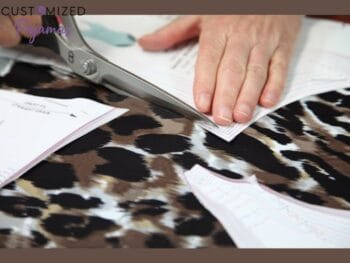
Step 1: Cutting and marking your fabric
Cut two mirror-image pieces for the left leg and two for the right leg (four pieces total). If your fabric has a “directional” print (like little owls that shouldn’t be upside down), ensure all pieces are facing the same way before cutting.

Cutting and marking your fabric
Step 2: Sewing the inner and outer leg seams
Pin one front piece to one back piece with “right sides” (the pretty sides) facing each other. Sew down the outside of the leg and then the inside of the leg. Repeat this for the second leg. You should now have two separate fabric tubes.
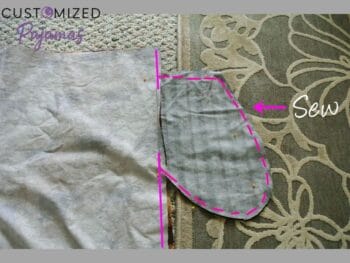
Step 3: Sewing the crotch curve (The “U” seam)
Turn one leg right-side out and tuck it inside the other leg (which should stay inside-out). Align the curved crotch seams and pin them together. Sew in a continuous “U” shape from the front waistband, through the crotch, to the back waistband. This is the most critical seam for durability, so consider backstitching at the start and end.

Sewing the crotch curve (The “U” seam)
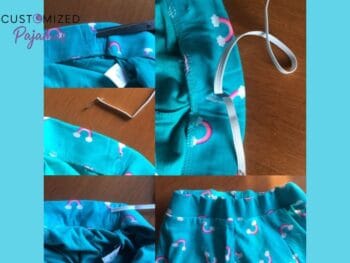
Step 4:Creating the elastic waistband casing
Fold the top edge of the pants down by 1/4 inch and press with an iron, then fold it down again by 1.25 inches. Pin and sew around the circle, leaving a 2-inch gap at the back to insert the elastic.
Step 5: Threading and Securing the Elastic
Attach a safety pin to one end of your elastic and feed it through the 2-inch gap. Slide it all the way around the waistband until it comes out the other side. Overlap the elastic ends by 1 inch, sew them together with a zigzag stitch, and tuck them into the casing. Sew the 2-inch gap closed.
Step 6: Hemming the bottoms
Fold the bottom of each leg up by 1/2 inch, then another inch. Press with an iron to create a crisp edge. Sew around the circumference of each leg opening to finish your pants.

Hemming the bottoms
Troubleshooting common sewing mistakes
- Puckered Seams: This usually happens if your tension is too high or your needle is dull. Swap in a fresh needle and test on a scrap of fabric.
- Twisted Elastic: If the elastic twists inside the casing, use “stitching in the ditch”—a small vertical seam at the side and back seams—to anchor the elastic in place.
- Tight Crotch: If the pants feel restrictive when sitting, you likely need a deeper “U” curve. Next time, trace your template pants with more generous “ease” in the seat area.
In summary, learning how to sew pajama pants is a rewarding way to build your sewing skills while creating something functional and cozy. By choosing the right fabric, accurately tracing your pattern, and carefully following the “U” seam construction, you can create professional-looking loungewear at home.
Check out more posts from Customized Pajamas to find your perfect choice:
- If you’re looking for the perfect present, discover why are pajamas a good gift for your loved ones, or stay cozy during chilly nights by exploring what are the warmest pajamas available.
- To keep your wardrobe organized and pristine, we provide expert guides on how to fold pj sets together, along with essential hygiene tips on how often should you wash pajamas.
- For those who prioritize fabric care, our specialized tutorials on how to wash silk garments and how to wash satin pajamas will ensure your luxury sets stay soft forever.
- If you’re feeling crafty, try your hand at DIY projects like how to sew pajama shorts, how to make pajama pants smaller, or how to add pockets to pajama pants for that extra bit of convenience. And for the fans out there, don’t miss out on our fun styling tips for how to train your dragon pajamas!